
“There’s nothing else we could have done to increase our profit in 2018!” – said no ecommerce business owner ever.
No matter how hard you try, there’s always room to improve, and there are always opportunities to sell more. In that spirit, our goal is to help you roll out better PPC strategies for the New Year. By the end of this article, you’ll have learned advanced strategies on what you need to do in order to have stellar Google Shopping Campaigns in 2019. We’ll help you break sales records and find your own kaizen into the Shopping Ads world.
Before we take PLAs to the next level, let’s start off with the basics:
What are the Product Listing Ads (PLA's) and why use them?
Google Shopping Campaigns, also known as Google Product Listing Ads (or PLAs for short), are the ideal way for retailers to promote their online and local inventory. Among other advantages, most eCommerce businesses experience a significant increase in CTR, compared to text ads for the same queries.
Also, just by displaying your product’s pictures and prices, people get a stronger sense of what you’re selling, so you get better-qualified leads. Not only will your ad show for relevant searches, you may also get double exposure. A shopping ad and a text ad can appear at the same time, for the same search query, hence the broader presence.
Google Shopping Ads seem to have been Google’s main fuel in Q1 of 2018, covering 60% of text ads, and registering a 47% increase in impressions year over year. Therefore, it is of maximum importance to have your campaigns very well optimized.
How to set up a Google Shopping Campaign
Ok, by now you should be convinced that Adwords Product Listing Ads are the right thing for you. Let’s explore how to set them up.
First, you have to set up your Merchant Center account. This is the tool where you upload all your product data and make it available for Google. You can find out more on how to link Google Ads and Merchant Center, and how to create your product feed here.
Our main focus is going to look at how to take your AdWords Product Listing Ads from basic to advanced, so you can leave your competition in the dust.
PLAs are the foundation for eCommerce stores on Google. We’ve covered this before in our YouTube video about Advanced AdWords Shopping Campaigns Optimization.

PLAs are typically highly converting, better than text ads (it prevents people who don’t like the price or the image to click it), and they are super targeted. You don’t have to worry about things like match types because the keywords come straight from the product feed you upload, so you don’t actually pick the keywords you want to bid on.
Google Shopping Campaigns are quite the tricky beasts.
On one hand, you appear for relevant, targeted, commercial terms, directly from your shopping feed. On the other hand, you have to pay the same price for each one of them. Just because every term will be relevant, it doesn’t mean they’re going to convert at the same rate, so they won’t be equally profitable.
And this is where it starts to get fun: we’re about to look at how to organize and optimize your shopping campaigns, in order to increase your ROAS. You ready to tame those PLAs?
The Multi-Campaign Structure:
Configuring Google Product Listing Ads for success
Organizing and optimizing your Shopping campaigns is totally different from regular keyword-based search campaigns. One of the best approaches, query-level bidding, has been available in Google Ads for about 4 years. Yet, most advertisers are ignoring this opportunity and sticking with a single Shopping campaign for all their products, segmenting by brand at the ad group level at best.

Image source
If you find yourself feeling as if you have no idea how to structure your Shopping Campaigns, don’t worry, you are definitely not alone. The antidote to your anxiety sits inside a single word: strategy. A killer strategy, actually, on how to organize you PLA campaigns for the very best results.

Ladies and gents, let’s dive in into (drumroll, please!) PLA reverse-engineering (aka the Multi-Campaign Structure) based on campaign priorities to separate user intent.
What does that even mean? Basically, in order to have better control over your PLAs, you have to set multiple campaigns:
- Campaign 1 – Here, you’ll have your high-converting terms, you’ll have the highest bids, and a super high ROI. You’ll get tons of great traffic. As for the negative keywords, you’ll block the weak terms.
- Campaigns 2 (or Campaigns 2 and 3) – Here, you’ll have weaker, but still relevant terms, you’ll bid lower, get good traffic at a profitable rate and your negative keywords are going to block the stronger terms from Campaign 1.
Most people don’t structure their Google Shopping Campaigns like this, so taking this extra step will put you way ahead of your competition. Keep reading for even more advanced strategies.
The Multi-Campaign Structure Setup
There are two ways to set this up: a 3-campaign model and a 2-campaign model.
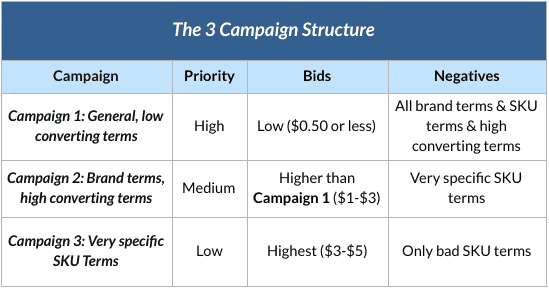
The 3-Campaign Structure
- Campaign 1 is where all your general and your worst converting terms will funnel into.
- You should give this campaign the highest priority, and the lowest bids.
- All your brand terms, SKU terms and any other high converting terms will be blocked from this first campaign, so you need to add them as negatives here.
- In Campaign 2 you’ll have your brand terms, your high converting terms, set at a medium priority.
- Here, you’ll have higher bids than in the first campaign and your negatives will include very specific SKU terms.
- Campaign 3 will shelter your very specific SKU terms, at a low priority setting.
- Your bids are the highest and your negatives are only the bad SKU terms.
How exactly does this strategy work?
When a term gets triggered, Google looks at what campaign to serve the ad to and starts with the highest priority first. However, if a negative blocks the way, Google moves on to the next campaign.
So – it starts with the priority, then it looks at the negatives, and then it moves to the next, which is weaker, but still relevant.
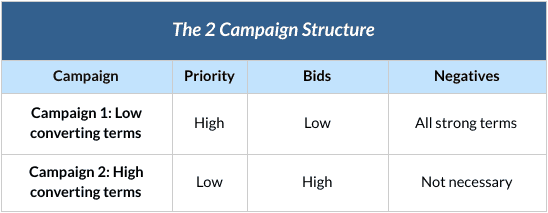
The 2-Campaign Structure
The 2 Campaign Structure merges campaigns 2 and 3, the brand and the SKU, into one campaign. It’s easier and it gets the exact same result.
- Campaign 1 will have the low converting terms, high priority, low bids and will block all strong terms.
- In Campaign 2, you’ll have high converting terms, the priority set to low, and high bids. Technically, in this case, you won’t need any negatives, because the terms that are added as negatives in Campaign 1 will trigger here.
Negative keywords are critical to this kind of PLAs structure, both for the 3-Campaign Structure and the 2-Campaign Structure. If you are eager to find out more about their use in shopping campaigns, stay tuned! We’ll have them covered, with all their ins and outs, in a dedicated article on the Search Scientists blog.
In our opinion, if you want to see higher conversion rates, higher sales volumes, at the lowest cost possible, then every single shopping campaign should be set up in this manner. By using 2 or 3 Shopping campaigns, your best keywords are given more competitive bids, and you’ll get more sales per day. Kudos to them!

Image source
TL;DR kind of guy? We also talk about this advanced PLA structure in this video right here:
So, which one should you choose?
The 2 Campaign or the 3 Campaign Method?
Most stores under $10K/mo. in ad spend can use the 2 Campaign structure. The 3 Campaign method works better for larger accounts.
While it’s true that the impact of this will be bigger the larger the campaign ad spend is, (therefore it will be more impactful for accounts over $20K/mo. in ad spend rather than $2K/mo. in spend) – that’s true about any optimization.
It’s just that a 10% boost means more dollars moved when you’re spending $20K/mo. VS $2K/mo.
So usually with smaller accounts, you can go with the 2 Campaign approach, as a way to get the most impact without adding another campaign into the mix.
Keep in mind that ideally, none of these campaigns (no matter the structure you opt for) ever become budget-limited, otherwise the whole system breaks.
Question from one of our YouTube channel subscribers:
How do you use the multi-campaign method for feeds with 50 thousand SKUs?
Answer: You’d do it exactly the same way you’d do it with 50 SKU’s.
- Campaign 1: General, Low Converting Search Terms (Beta Campaign)
- Priority: High
- Bids: Low
- Negatives: All Brand terms & SKU terms & irrelevant terms [How to add these terms? Use Excel + Google Ads Editor to add product titles, SKU’s, etc.]
- Campaign 2: Brand + SKU Terms, High Converting Search Terms (Alpha Campaign)
- Priority: Medium
- Bids: These should simply be higher because higher converting traffic is flowing to this campaign
- Negatives: Irrelevant terms
Top Tips and Tricks for Succeeding with Shopping Ads
Now that we’ve seen how a successful Google Shopping campaign setup looks like, we’d like to share some additional tips and tricks on how to optimize your PLAs for ROAS increase.
Click or tap on each point to see more details:
- In your product title, use keywords that people actually search for in Google. This will increase your CTR;
- A picture is worth a thousand words. Use simple and clear product images. Regarding the pixel usage, a piece of advice would be to use all the space. If you are dealing with bigger images, put them in perspective and this could trick the eye;
- Make use of seller ratings in your Shopping Ads. They help a lot with both CTR (click through rate) and CVR (conversion rate). If you don’t have seller ratings, you won’t be in the top position;
- Try and implement Promotion extensions – from Merchant promotions;
- Generate multiple products for the auction. If you’re in the retail industry, try to upload every single size or SKU of the product. If you’re into services, a possible solution is to create bundles;
- Use slashed prices! Pricing plays a very important role in Google Shopping Ads. Cheaper products tend to generate more traffic, much faster, and their CVR is significantly better (while CPA is lower) compared to the more expensive products. Moreover, only a few products are responsible for more than half of all conversions. A killer strategy would be to sell those few products cheaper, instead of increasing their bids. Don’t forget that discounted prices win ever time!
- Set up your “zero conversions” alert and your “unacceptable ROI” alert. This way, you’ll avoid advertising wasted spend.
- Check your Benchmark metrics: Benchmark CTR, Benchmark CPC or Price Benchmark, (which is still in Beta) to see data from other advertisers.
- Monitor your competition using Google Auction Insights.
- Try smart bidding strategies (Target ROAS, Maximize Clicks or Enhanced CPC).
- Make use of remarketing to increase your ROAS. Combine your previous visitors’ audience (who are more likely to convert) with Shopping Ads to target them when they are proactively buying, with increased bid adjustments.
Empower Google’s algorithms with a Smart Shopping Campaign
Have you tested Smart Shopping Campaigns? If you haven’t experimented with these yet, 2019 might be the perfect time to start. This new campaign subtype combines Shopping Ads and dynamic remarketing and uses Google’s machine learning to automate bidding and ad placements. The system pulls data from the product feed and tests different combinations of image and text to show the most relevant ads in Search, Display, Youtube, and Gmail.
Basically, this campaign will be automatically goal-optimized to increase conversion value or maximize conversion value at a specific ROAS.
In order to set it up, you’ll need to have:
- Minimum 20 conversions over the last 45 days across existing Shopping campaigns;
- Conversion tracking with transaction-specific values;
- Tagging for dynamic remarketing;
- A global site tag to your website and a remarketing list of at least 100 active users (or, if you have one, you can link to your Google Analytics account and set up tags there).
Google’s recommendation: in order to meet the conversion and remarketing requirements, use a standard Shopping campaign with a Maximize Clicks bidding strategy.
Closing thoughts
Try out this reverse-engineering PLA structure, as well as our other tips, and leave us a comment if it worked for you. This could be the advanced technique you’ve been looking for to take your Shopping campaigns to the next level. We hope it helps you to smoke your competition, make more sales, and maximize your ROAS.
As always, Google is continuously making changes to their Shopping campaigns. If you want to stay up to date with PLAs and everything else that happens in the PPC world, hit the “Subscribe me” button below for receiving our newsletter. Or, if you’re already testing Shopping campaigns and need help (or you want to free up some time), you can request a PPC proposal, and we’ll gladly come up with suggestions to help you increase your ROAS.
For more helpful PPC tips and tricks, check out our entire series of 100 days of Google Ads Help.
Cheers!
